PAPER WALL FLOWERS!!
Items needed:
* 6 - 12x12 papers
* A pair of scissors
* Fabric cutting pad or ruler
* Glue gun
* Pen
* 3-4 ft. of ribbon
* Tape
* Fabric or lace for center flower {between 2-3 yards (4-6 in. wide)}
* Stamp ink
Let me apologize ahead of time for the plethera of pictures.....31 to be exact.! I'm a very visual learner/teacher. Okay, let's begin!!
Choose your 6 12x12 papers. You can choose however you like, but I like having three matching pairs.
{My papers came from a SUPER cute paper book: 'Lovenest'. And NO I didn't not pay $19.99.....$10.00 for 54 pages.!}
Here are my 3 pairs
This part is simple. Flip your paper so the decorated side is facing down {it's easier this way to make sure your cuts are even}. All you have to do is make a rounded curve on both sides of the paper. You can see at the top of the picture how much I actually cut off.....not a ton.
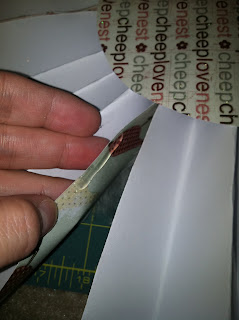
Folding the top decorative part down first {this is key!}. Do a back and forth pattern, accordion style; like you're making a paper fan {example picture below}.
Do all 6 of your papers
Next, take your 6 folded papers and flatten them a little bit
Grab another piece of paper and cut out a circle {6 in radius}
I found it was easier to fold your circle in half and draw your first line this way. Make sure to use your ruler, it doesn't have to be perfect {a great example...MINE, totally NOT perfect, but it works}. After you have 6 triangles your ready to start putting your wall flower together!
Before you start gluing, decide how you want your pattern to go. Take your first petal, grab it at the bottom and pinch it together. Glue to crud out of your triangles, you'll want lots of glue to keep it together.!

After you have your triangle glued place your petal on top. Hold it there for at least 30 seconds before moving on to the next on.
Continue gluing your petals on.....
It should look something like this when you've finished gluing
Next step: Making the center flower. I used about 3 yards of lace. You'll want a bigger flower for the center. Click {HERE} for a tutorial on How-To make a rosette flower {instead of a 1 in. cut like in her tutorial, do more of a 3-4 in cut. You'll be making a bigger flower (close to 4-5 inches in radius) so you need to bulk. OH, and you don't have to use fabric glue, a glue gun works just fine}
You can doll up your flower if you want. I placed feathers on mine. If not, it looks great by itself, too!
Once your center rosette flower is finished and made start placing lots and LOTS of glue on the back of it. Don't be shy ladies, glue it up.! You want it to stay on.
Place it in the center of your paper flower and let it dry for a good 2-3 minutes before moving onto the next step
After your fabric/lace rosette is securely glued onto the front of your paper flower, flip your flower over and follow the next step.
Right now your petals are possibly a tad bit apart from each other, right? If this is the case place a dab of glue {about an inch in length} on the inner part of the petal, close to the edge. Pinch the two sides together. Do this to all the petals. {See pictures below}
Now to hang the wall flower. Cut 3-4 ft. of 1/4 inch ribbon {you can use whatever ribbon you please, I like to use skinner ribbon so my focus falls on the wall flower and not the thing thats holding it up}
I like to make a bow in the middle of the ribbon {this will be the top}
Decide how you want your flower to hang. Once you chosen, take your glue gun, starting from the center and out, make a nice line of glue.
Place the two ends in the center and push ribbon into the glue. {WARNING}: you will most likely burn your fingers a little bit, so be careful.!!
Just for added security I like to place 4-5 strips of tape on back
Place more glue at the top of the petal that your ribbon is vertically headed, and push your ribbon in it. Let it dry completely.
This next step is totally optional, but I love it.! If you have some stamp ink use it to go around the edges of your paper petals. It helps to add more drama to your petals.
You're done.!! Not too shabby, eh?!
Just to give you an example of how big they are. There's my little stinker standing underneath the flower. They're huge.!! They make amazing wall decor for any room.!


I love this Darc!! So cute!
ReplyDeleteWOW! What a fun project! I can't wait to make it!
ReplyDeleteSo a friend found this flower on your blog and asked me to make it for her so the next day I had her come over and pick it up. I was so fun and so easy to make. So than we decided that she needed 3 more to go above her bed as a head bord peice so I made her 3 more. She liked those so much that we got together and made one that she wanted to give to a friend. I was such a fun project and very inexpencive. Thanks for sharing! I am even making one for my son's room with my own twist on it, with train,Cars, and sports paper. Insted of a flower it is just a full circle with 10 peices of paper and and in the shap of a circle (not cutting the ends off)With a Baseball as a center it looks so cute! Thanks again!!! brittescott@yahoo.com
ReplyDelete