Wednesday, August 10, 2011

Spicing Up a Cheapo Frame


Ulta was having an amazing sale on their name brand eye shadow, blush and more, so I partook.  Since we moved to a smaller house, I lost a ton of bathroom space.  What to do?  Find a cheap frame at Goodwill on their half off day, and go to work.!

What you'll need:
Frame - any size (mine was 10 x 13)
Galvanized steel to fit - (I got a 2' x 3' at Home Depot for $10.00, so I have plenty left over for another project)
Sandpaper - (I used 220 grit)
Primer
Spraypaint, color of your choice
Minwax, stain of your choice
Old rags
Clear gloss 

Ever since I discovered primer, I don't do a whole lot of sanding on projects like this.  I did however spend about 2 minutes sanding the gloss coating off of my $1.50 frame. 
I then sprayed a nice coat of primer on.
Then the color of my choice, which happened to be Krylon's "Ivory" in satin.
 I then got my little piece of 220 grit sandpaper back out, and just randomly sanded some spots.
 Next I got an old Miley Cyrus shirt out of my dresser drawer (what on earth was I doing with a Miley Cyrus shirt??), and cut it up.  I dipped one of the pieces of shirt into the Minwax and covered one side, then got another clean piece and randomly wiped it off, leaving some stain heavier in some spots, and some not so much.  Even though I didn't get my rag damp, it's a good idea - it will wipe the stain off easier.  There really is no right or wrong way to do this, it's all about how much stain, and the 'aged look' that you are trying to achieve.  (Sorry, forgot to take a pic of this process.  Maybe it was the 110 degree weather that fried my forgetful brain?)

Almost done.  Had hubby cut my piece of steel (you have to be REALLY careful when cutting galvanized steel, it is super sharp and you may wind up losing a digit or two).  I saved the glass from the frame in case I found a frame that didn't have one. Glass is gone, steel is put in. You could glue the frame in, but I didn't.  You could also get adhesive spray to spray on the steel and glue fabric on, to make your frame even spiffier.  I chose not to, because I use a gallon of hairspray a day, and didn't want my fabric getting sticky.
 Ta-da.!  It went from an ugly 80's looking oak frame, to this old fashioned looking keeper.  I added a few rosettes that I whipped up, also put a saying with a magnet that we made (these are really to die for - just think Martha Stewart glitter), and I now have that much needed space for my Ulta purchases.  Just add magnets on the back (I used a high temp glue gun) of your items, and they stay with no problem.
A close up of the rosettes and the sides. 
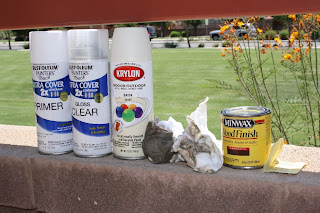
Items used.
Easy and inexpensive, just the way we like it..!

Thursday, August 4, 2011

PAPER WALL FLOWERS!!


Items needed:

* 6 - 12x12 papers
* A pair of scissors
* Fabric cutting pad or ruler
* Glue gun
* Pen
* 3-4 ft. of ribbon
* Tape
* Fabric or lace for center flower {between 2-3 yards (4-6 in. wide)}
* Stamp ink


Let me apologize ahead of time for the plethera of pictures.....31 to be exact.! I'm a very visual learner/teacher. Okay, let's begin!!


Choose your 6 12x12 papers. You can choose however you like, but I like having three matching pairs.

{My papers came from a SUPER cute paper book: 'Lovenest'. And NO I didn't not pay $19.99.....$10.00 for 54 pages.!}


Here are my 3 pairs


This part is simple. Flip your paper so the decorated side is facing down {it's easier this way to make sure your cuts are even}. All you have to do is make a rounded curve on both sides of the paper. You can see at the top of the picture how much I actually cut off.....not a ton.


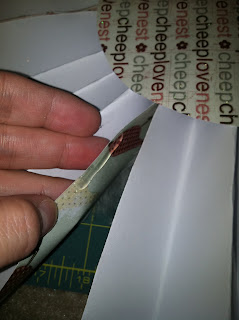
Folding the top decorative part down first {this is key!}. Do a back and forth pattern, accordion style; like you're making a paper fan {example picture below}.


 Do all 6 of your papers


Next, take your 6 folded papers and flatten them a little bit


Grab another piece of paper and cut out a circle {6 in radius}


I found it was easier to fold your circle in half and draw your first line this way. Make sure to use your ruler, it doesn't have to be perfect {a great example...MINE, totally NOT perfect, but it works}. After you have 6 triangles your ready to start putting your wall flower together!


Before you start gluing, decide how you want your pattern to go. Take your first petal, grab it at the bottom and pinch it together. Glue to crud out of your triangles, you'll want lots of glue to keep it together.!


After you have your triangle glued place your petal on top. Hold it there for at least 30 seconds before moving on to the next on.


Continue gluing your petals on.....


It should look something like this when you've finished gluing


Next step: Making the center flower. I used about 3 yards of lace. You'll want a bigger flower for the center. Click {HERE} for a tutorial on How-To make a rosette flower {instead of a 1 in. cut like in her tutorial, do more of a 3-4 in cut. You'll be making a bigger flower (close to 4-5 inches in radius) so you need to bulk. OH, and you don't have to use fabric glue, a glue gun works just fine} 


You can doll up your flower if you want. I placed feathers on mine. If not, it looks great by itself, too!

Once your center rosette flower is finished and made start placing lots and LOTS of glue on the back of it. Don't be shy ladies, glue it up.! You want it to stay on.


Place it in the center of your paper flower and let it dry for a good 2-3 minutes before moving onto the next step


After your fabric/lace rosette is securely glued onto the front of your paper flower, flip your flower over and follow the next step.

Right now your petals are possibly a tad bit apart from each other, right? If this is the case place a dab of glue {about an inch in length} on the inner part of the petal, close to the edge. Pinch the two sides together. Do this to all the petals. {See pictures below} 


Now to hang the wall flower. Cut 3-4 ft. of 1/4 inch ribbon {you can use whatever ribbon you please, I like to use skinner ribbon so my focus falls on the wall flower and not the thing thats holding it up}


I like to make a bow in the middle of the ribbon {this will be the top}


Decide how you want your flower to hang. Once you chosen, take your glue gun, starting from the center and out, make a nice line of glue.


Place the two ends in the center and push ribbon into the glue. {WARNING}: you will most likely burn your fingers a little bit, so be careful.!!


Just for added security I like to place 4-5 strips of tape on back


Place more glue at the top of the petal that your ribbon is vertically headed, and push your ribbon in it. Let it dry completely.


This next step is totally optional, but I love it.! If you have some stamp ink use it to go around the edges of your paper petals. It helps to add more drama to your petals.


You're done.!! Not too shabby, eh?!


Just to give you an example of how big they are. There's my little stinker standing underneath the flower. They're huge.!! They make amazing wall decor for any room.!


Thursday, July 28, 2011

Inexpensive Photo Holder

Even though I use this as a photo holder, the young women that I was with (and helped them make their own) decided to use it for other things. Love notes being one of them.....

With that said, let's get to work! I made a trip to one of my favorite places; Home Depot.  That's right, Home Depot is one of my favorite places - it's a crafty person's dream place.!  Who knew a mans DIY store could bring so much happiness to the female persuasion. 
Off to the wood department we go.  I find what I'm looking for a nice 1"x4'x8' piece of wood.  It was just a few bucks, but I needed two pieces for all of the young women.  I take my 2 8 foot pieces to the nice Cutter Man.  As Mr. M. let's him know that we need them cut in 24" pieces, lo and behold, what do I see behind me - a trash can.  What's in the trash can you ask?  The same exact wood that's about to be cut.! HOLD YOUR HORSES Mr. Cutter Man.!  What may I ask are you going to do with this wood?  "Nothing, it's trash".  Maybe to you Mr. Cutter Man, but not to me.  "Can I have it?"  Yes, it's trash, he says.  Awesome.  I got four 24" pieces out of the trash. But that's not the end of the story.  About 10 feet away is a Home Depot cart full of all kinds of wood pieces marked ".51 cents".  That's right, .51 cents, NOT .50 cents, or .55 cents, but .51 cents.  Guess what's in there??  You got it, the same exact pieces of wood.  There are 3 - 4 foot pieces in there.  Booyah!  I walked away with 18 feet of exactly what I needed for a whooping $1.53.  The lesson here?  Ask Mr. Cutter Man at Lowes and Home Depot where their trash bin and discount wood cut cart is, because he says they have them there all of the time.

Ok, I'm really moving on with the tutorial now.  Get a 24" long 1 x 4, sand it down really well.

The next step is by choice.  You can either choose to prime to your wood, or you don't have to.  I put one coat of primer on, then two coats of spray paint.  Primer: Rust-oleum 2x Primer, top coat is Rust-oleum 2 x Strawflower in satin.

While my coats were drying, I spray painted my clothes pins (leave one side unpainted, makes a better hold when you go to glue onto the wood) with Krylon's Classic Gray, in Glossy.  I purchased my clothes pins at Hobby Lobby for $2.10 for a package of 24.  (They were regularly $2.99, but all of their wood items were 30% off).  I used 6 for my own board - two of my young women used 10 and it looked just fine, not too crowded.

Next time is again by choice.  I used Rust-oleum's 2x clear gloss to seal all of the wood.  Because of a shortage of time that I had, I used a high temp glue gun to glue the clothes pins onto the wood.  I normally would have used a wood glue, but the high temp glue gun really held them into place. I am a little funny about spacing...it has to be exact.  As you can see they are perfectly spaced apart, but you can put them however you like.  Ü

And voila, in no time you have a super cute, incredibly easy, and very inexpensive project.  Younger kids could easily do this with adult supervision.  You can decorate it however you would like - rub-ons, stamps, flowers, ect. 

Here are the spray products that I used.   Happy crafting.!

Monday, July 25, 2011

Are you ready to turn this...........


.......into this?!?


Let's get started.!!


Items needed:

*Wicker chair
*Outdoor/Indoor spray paint, 2 cans
*1-1.25 yards outdoor fabric
*1-24 oz bag of Poly-fil
*Blank Paper
*Pins, scissor, fabric marker, tape, ruler or fabric measure, pen or pencil  
{decorative pillows are optional, but definitely add POP to the chair}


When choosing the color of paint you'd like to use make sure to imagine the complete project. What do you want it to look like? Will it make and union the room or area you are placing the chair in? Colors are so fun, use them!


I absolutley LOVE turquoise.! My front porch needed color badly and turquoise seems to always be a happy/welcoming color. I choose Valspar's 'Exotic Sea' with a gloss finish. When using spray paint make sure you are in a WELL ventalated area. I sprayed in my backyard. If you're worried about getting the paint on the ground just lay newspapers, plastic, or cardboard underneath the chair.

Start by doing the first layer of paint. I love spray paint because it drys quickly. The trick with spray paint is to spray by using a side to side motion. Make it an even coat all over the chair.

When the first layer is dry, go ahead and do another. {depending on what color your wicker chair was before will determine how many layers you need to do....because my chair started off dark blue I needed atleast two layers}

Let your chair dry for 24 hours outside.

As your waiting for your chair to dry, it's the perfect time to make your cushion.!!


Most of the time you're not going to have a store bought blue print of how to make your exact cushion {size, shape, fullness}. So this is why we make our own ladies.!! Let's do it....

This is where you'll need your blank paper, pen or pencil, fabric measure, tape, pins, and scissors.

To make your simple yet 'gets the job done' cushion blue print start off by taping 6 {you might need more if your seat is larger} blank papers together {pictured below}.

My measurements:

*Arm to arm: 21 in.
*Front arm to back arm {before loop}: 11 in.
*Front loop to back loop: 7 in. curved
*Back of seat: 15 in.
Back of seat to front of seat: 17.5 in.

Your measurements will most likely differ, but that's okay.! The main important thing is making sure to measure all widths and lengths and your golden.

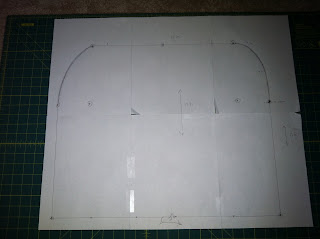
Draw your measurements out on your homemade paper blue print. {a little trick I learned to double check your blue print is even, is to fold it slightly in half after your finished. If both side match up your good to go.! If not just make your needed adjustments and lets move on}.


Here's mine....beautiful isn't it?? Yeah, we'll work on the beauty thing later. It might not be pretty but it serves the purpose and gets the job done.!


Cut out your blue print and get rid of the access paper.

You should be able to fold your fabric in half {pictured below}. Once your fabric is even lay your BP on top.


You always want to give yourself an inch or two extra from your measurements. I gave myself 2.5 in. extra because I wanted a fluffier cushion, you don't need that much if you don't want, but make sure it's atleast an inch. Pin your BP on your fabric {make sure you pin both sides of fabric}.


Carefully cut out your pattern {making sure to remember to give yourself that inch or two extra}.

Turn the fabric so the top design on both sides is on the inside {pictured below} and pin.


Once you have it pinned all the way around it's now time to sew.! I made my stitch at the 3/8 or '10' mark on my footer.


After stitching all the way around, make sure to leave an opening big enough so that you can put your hand/stuffing in {pictured below}.


Before you turn your cushion right side out make sure to clip off your corners {be careful not to clip to close to your stitching!}. If your corners aren't clipped you'll have a more rounded edge instead of a corner.


When it comes to the fluff it's really up to you what type or kind you want to use. I chose Fairfields 'Silky Soft' poly-fil. It's not very expensive {run you about $8-9 per bag}. Some people would rather have foam and batting, but that will run you well over $40 per cushion, and that defeats my whole purpose of refinishing for cheap.! Cheap is good and this type of poly-fil is perfect for this job.


Start stuffing and fluffing.!!

This part is probably going to be your most time consuming {20-30 min}. Because we are using a poly-fil you will get 'lumps' because your not putting one big piece in, your placing multiple pieces in. So the trick is to work with the fil. Place larger pieces in the cushion at the beginning and  as you start nearing the end {about 30% left} start using smaller pieces and fill in the gaps that you can see. I use all 24 oz of poly-fil. Just know that it won't be 100% perfect, there will be small raises here and there, but it's an outdoor cushion, no biggie.!!


Once you've stuffed your cushion it's time to close. You have two options at this point: you can either hand sew it shut or machine sew it shut.....it's totally up to you and your preference. I maching sewed mine because I was being lazy. If that's the same case for you......pin it, sew it.


My side kick and partner in crime. Isn't she adorable?!?!


And viola.!! You have yourself a shabby chic, adorable cushion for your new chair.!!

Simple right?


Pillows are amazing ways to make your newly refinished masterpiece look that much more amazing. If your on a tight budget, don't worry, your new cushion and freshly painted chair will look just fine.! I got all three pillows at Hobby Lobby for $25.50.


Look at your chair, it's amazing!! You'll have friends and neighbors wanting you to help them refinish thier old stuff.!

All in all the total cost to make the chair was $54.50 {including pillows} and $29.00 {without pillows}.

Now that's a steal.!!